
These Tortitas de Atún (tuna cakes) use just 2 cans of tuna and are ready in 20 minutes, perfect for a snack, lunch, or dinner everyone will love! An easy and tasty recipe for any day!

Tortitas de atún are probably not the first thing that comes to mind when you think of tuna, you're more likely thinking of a tuna sandwich or tuna salad but they're a whole different situation. They're crispy on the outside, soft and flavorful on the inside, and made with simple ingredients you most likely already have sitting in your kitchen. They come together super quick, fry up nice and golden, and once you try them, I’m sure, you'll keep making them again and again.
Love tuna recipes? Try our easy appetizer, antipasto de atún, our zesty ensalada de atún (tuna salad), easy sandwich de atún (tuna sandwich), or this delicious tuna casserole, recipe by Spend with Pennies.
Jump to:
What are Tortitas de Atún
Tortitas de atún are a classic Mexican dish made with canned tuna that's mixed with simple ingredients like eggs, breadcrumbs, and seasonings, then shaped into small patties and pan-fried until golden. They're the perfect combo of crispy on the outside and soft on the inside. In Mexican cooking, they're often served with a light tomato-based sauce (caldillo) or enjoyed just as they are with rice, salad, or even tucked into a tortilla. It's one of those humble, budget-friendly meals that's been made in home kitchens for generations.
Ingredients You Will Need
- canned tuna
- onion
- green pepper
- garlic cloves
- mayonnaise
- homemade breadcrumbs
- lemon juice
- parsley
- salt and pepper
- egg
- oil
See my recipe card below for a complete list of the ingredients with measurements and instructions.
Lemon Garlic Aioli
- mayonnaise
- minced garlic
- lemon juice
- sugar
- salt
- a few dashes of hot sauce (optional)
Variations for Tortitas de Atún (Tuna Cakes)
- Grated carrots
- Zucchini (squeezed dry)
- Finely diced jalapeños or serranos
- Mashed potatoes added into tuna mixture
- Panko breadcrumbs (inside and/or outside)
- Crushed crackers (like saltines or Ritz)
How to Make Tortitas de Atún
Start by making the dip so it's ready once the tortitas are done.
Step 1: Lemon Garlic Aioli
- Add all the ingredients to a bowl and mix well with a fork until smooth and combined. Taste and adjust salt if needed. Set aside.
Step 2: Homemade Breadcrumbs
- Add slices of bread to a blender and pulse until you have fresh breadcrumbs. Set aside.
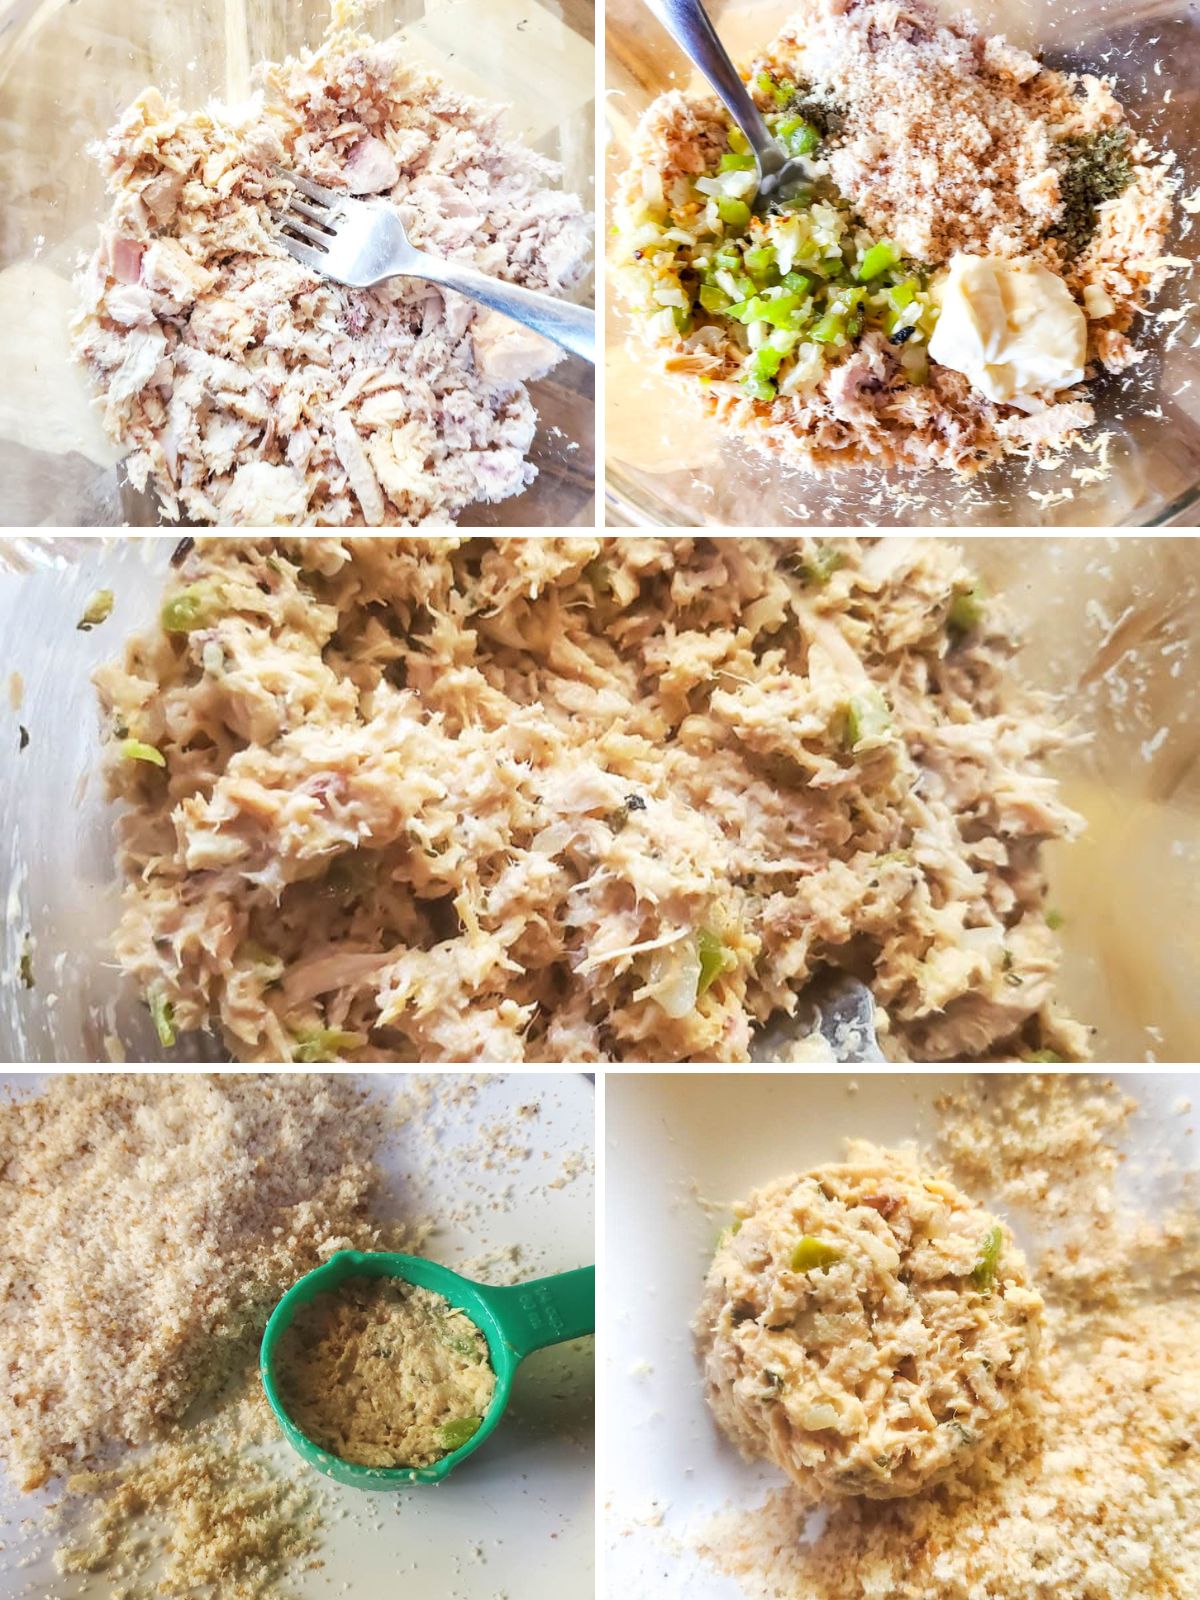
Step 3: Prepare the Tuna Mixture
- Open the tuna cans and drain the liquid well. Add the tuna to a bowl and flake it with a fork.
Step 3: Saute Onions, Peppers and Garlic
- In a skillet over medium heat, add ½ tablespoon of oil and cook the peppers and onions until softened. Add the garlic, stir and cook for 30 seconds.
- Remove from heat and add the ingredients to the bowl with the tuna. Add the remaining ingredients and mix everything together until well combined.
Step 4: Forming Tortitas de Atún
- Option 1: Scoop about 2 tablespoons of the tuna mixture into your hand and shape into a small round cake.
- Lightly coat with breadcrumbs on both sides. Repeat the process until all cakes are formed and coated.
- Refrigerate for 1 hour before frying. Note: This step is optional, but it helps the cakes hold their shape and not fall apart.
- Option 2: Use a ¼ cup measuring cup and add about 2 tablespoons of tuna mixture inside. Gently press down, then flip it onto a plate to form a uniform cake. Repeat with the remaining mixture.
- Coat each cake with breadcrumbs on both sides.
- Cover the plate with plastic wrap and refrigerate for 1 hour before frying. Note: This step is optional, but it helps the cakes hold their shape and not fall apart.
Step 5: Frying the Tortitas
- Add about ½ cup of oil to a skillet over medium heat. Carefully place the tuna cakes into the hot oil and cook until golden brown on one side. Flip and cook the other side until golden and crispy.
- Remove and drain on paper towels.
- Remove and drain on paper towels. Serve immediately with the lemon garlic aioli and lemon wedges.

Serving Suggestions
Tortitas de atún are one of those things you can serve a bunch of different ways, which makes them super easy to work into whatever you're cooking that day. You can keep it simple, turn it into a full meal, or even serve them as a quick snack, totally up to you.
- With rice and beans: You really can't go wrong here. A side of white rice and frijoles (black beans) turns this into a simple, filling meal that always hits.
- With a fresh salad; If you're in the mood for something lighter, serve them with a fresh salad. Lettuce, tomato, cucumber, and a squeeze of lime is all you need, super simple but really good.
- With Mexican red sauce (caldillo): This is more on the traditional side.
- Tucked into tortillas: Honestly, so good this way. Just add them to warm tortillas with a little lettuce and drizzle some lemon garlic aioli on top…so good.
- With avocado or guacamole: Adding avocado just makes everything better. That creamy bite with the crispy tortitas is chef's kiss.
- With tostones: If you want a little Caribbean twist, serve them with crispy tostones on the side. The crunch on crunch combo is so good, especially with a little sauce for dipping.
- As a snack or appetizer: You can also make them a bit smaller and serve them as a snack with some dip on the side. Super easy and always a favorite.
How to Store & Reheat
If you happen to have leftovers (which doesn't always happen 😅), these store really well.
- To store: Let the tortitas cool completely, then place them in an airtight container and keep them in the fridge for up to 2 days.
- To reheat: The best way is in a skillet over medium heat with a tiny bit of oil. This helps bring that crispiness back. You can also reheat them in the air fryer for a few minutes until warmed through and crispy again.
- Microwave (if you're in a rush): It works, but they'll be softer and lose that crisp texture a bit.
Cathy’s Expert Tips
- Drain your tuna really well: I know it sounds basic, but this is a big one. If there's too much liquid, the mixture gets too soft and your tortitas can fall apart.
- Chill them if you have the time: You don't have to, but letting them sit in the fridge for a bit really helps them hold together better when frying.
- Give them space in the pan: Try not to crowd them. When they have room, they get way crispier instead of just kind of steaming.
- Keep your heat at medium: Too high and they'll brown too fast on the outside before the inside is ready. Medium heat keeps everything nice and even.
- Don't overwork the mixture: Mix just until everything comes together. If you pack them too tight, they can turn out a little dense.
Recipe FAQ’s
This usually comes down to too much moisture or not enough binder. Make sure your tuna is really well drained, and if needed, add a little more breadcrumbs. Make sure to chill them before frying too.
You can! They won't be as crispy, but still really good. Just bake them at 400°F and flip them halfway through.
Yes, and it actually works really well. You can shape them and keep them in the fridge until you're ready to cook.
I like to use solid white tuna canned tuna in water. Drain really well before flaking tuna with fork and mixing other ingredients.
Yes! You can freeze them before or after cooking. Just let them cool completely and store them in an airtight container.
Did you try this recipe? Please leave a ⭐ review below!
Click any of the images in the post to PIN this Recipe and don't forget to follow along on Pinterest and Facebook.
📖 Recipe

Tortitas de Atún (Tuna Cakes)
Ingredients
- 2 cans solid white tuna (in water)
- ¼ cup onion finely chopped
- ¼ cup green pepper finely chopped
- 2 cloves garlic finely minced
- 1 tablespoon mayonnaise
- 1 tablespoon lemon juice
- 1 tablespoon fresh parsley, chopped or 1 teaspoon dried parsley
- ¼ teaspoon salt and pepper
- 1 egg
- ½ tablespoon oil plus more for frying cakes
- 2 limes or lemons cut into wedges for serving
Homemade Breadcrumbs
- ½ cup homemade breadcrumbs about 3 slices of sliced bread
Lemon Garlic Aioli
- ½ cup mayonnaise
- 1 teaspoon garlic minced
- 1 teaspoon lemon juice
- ¼ teaspoon sugar
- ½ teaspoon salt
- a few dashes of hot sauce (optional)
Instructions
Lemon Garlic Aioli
- Add all the ingredients to a small bowl and mix well with a fork until smooth and combined. Taste and adjust salt if needed. Set aside.
Homemade Breadcrumbs
- Add slices of bread to a blender and pulse until you have fresh breadcrumbs. Set aside.
Tuna Mixture
- Open the tuna cans and drain the liquid well. Add the tuna to a bowl and flake it with a fork.
Saute Onions, Peppers and Garlic
- In a skillet over medium heat, add ½ tablespoon of oil and cook the peppers and onions until softened. Add the garlic, stir and cook for 30 seconds. Remove from heat and add the ingredients to the bowl with the tuna.
- Add the remaining ingredients and mix everything together until well combined.
Forming Tortitas (Option 1)
- Scoop about 2 tablespoons of the tuna mixture into your hand and shape into a small round cake.
- Lightly coat with breadcrumbs on both sides. Repeat the process until all cakes are formed and coated.
- Refrigerate for 1 hour before frying. Note: This step is optional, but it helps the cakes hold their shape and not fall apart.
Forming Tortitas (Option 2)
- Use a ¼ cup measuring cup and add about 2 tablespoons of tuna mixture inside. Gently press down, then flip it onto a plate to form a uniform cake. Repeat with the remaining mixture.
- Coat each cake with breadcrumbs on both sides. Cover the plate with plastic wrap and refrigerate for 1 hour before frying. Note: This step is optional, but it helps the cakes hold their shape and not fall apart.
Frying Tortitas
- Add about ½ cup of oil to a skillet over medium heat. Carefully place the tuna cakes into the hot oil and cook until golden brown on one side. Flip and cook the other side until golden and crispy.
- Remove and drain on paper towels. Serve immediately with the lemon garlic aioli and lemon wedges.
Notes
- Grated carrots
- Zucchini (squeezed dry)
- Finely diced jalapeños or serranos
- Mashed potatoes
- Panko breadcrumbs (inside and/or outside)
- Crushed crackers (like saltines or Ritz)


Chelsea says
My family absolutly loved these. Next time I will double the recipe 😊
Cathy says
That’s great to hear! Thank you so much for taking the time to let me know how much you and your finally enjoyed them and rating the recipe! 🙂